

One of the most important steps in a container project is purchasing the right shipping containers. Cargo containers form the backbone of your building, serving as the walls, floor, roof, and overall structural support.
While you may think that containers are so strong and interchangeable, any of them will work, the decision of what quality and condition of containers to purchase is actually quite important for avoiding future problems. And given that everyone is on a budget, there is no point in overpaying for more capability than you need.
For a given size and type of container. you can have vast differences in aesthetics, performance, and cost. In this article, we will focus on the pros, cons, and costs of some of the options you’ll find for sale. We’ll also discuss how containers are inspected while they are still in service, then teach you how to inspect your own containers before purchasing them.
Why is the Condition of Shipping Containers so Important?
A fundamental step of planning your shipping container home is selecting the correct containers for your needs. Your design will dictate the type and size of shipping containers you use (most commonly, a general-purpose (GP) container in a 20-foot or a 40-foot length, with either a standard or high cube configuration).
But selecting the right shipping container doesn’t stop there. The second part of the decision is determining what condition you want or need your containers to be in for your project. There is the temptation to cut corners a bit by finding the cheapest containers available.
However, this is not recommended. You could end up with structurally weak containers or containers that require a lot of repair work before they are sufficiently weathertight and appropriate for construction. Trying to fix either of these situations later can cause your building costs to spiral out of control.
Conditions for containers are determined via inspection, whether formal or informal. There are a dizzying variety of inspections that can and do take place in a container’s life, including the inspection you may do yourself during the purchase of your own containers.
Different Types of Professional Container Inspections
The act of inspecting containers is something that starts early and continues over the life of the container. In fact, manufacturers have their designs, facilities, and processes inspected before they even make a container.
Once the owner takes delivery of the container, there are ongoing tests and inspections that take place when transitioning between carriers and terminals, between lessees and lessors, during changes in ownership or changes in transport medium, or via other custody changes.
One entity that intimately touches all of this is the International Convention for Safe Containers (CSC). The CSC decided back in the early 1970s that containers needed a reasonable system of maintenance, repair, and inspection in order to provide for the safety of the public, shipboard workers, and land-based personnel.
You’re probably most familiar with the CSC’s Combined Data Plates (discussed below in the inspection section) that are mounted on the front of containers and that record some of the specifications and background information pertinent to that particular container. For in-service containers, the CSC also mandates that container operators use either an Approved Continuous Examination Program (ACEP) or a Periodic Examination Scheme (PES) to ensure safety standards are tested for and met.
The PES includes inspections every 30 months that are recorded on the Combined Data Plates. The ACEP requires inspections correlated with certain repair or custody changes but happening at least as often as the PES inspections.
The ACEP number is marked on the Combined Data Plate or nearby decal and correlates to the ACEP Online Database that records the operator, administrator, and other information. The actual dates of ACEP-related inspections aren’t publically recorded in the same way that PES inspections are recorded on the Combined Data Plate.
These two programs help owners monitor the condition and maintenance of their containers, but they don’t require specific inspection criteria or repair guidelines. Instead, container owners kind of regulate themselves, but do so with the help of a few different industry groups that have produced standards for inspection and repair.
However, there are different requirements for containers owned by shipping lines as compared to those companies that simply lease the containers. What you end up with is a handful of competing industry systems, such as:
- Unified Container Inspection and Repair Criteria (UCIRC): The standard from the International Chamber of Shipping (ICS) and the in-service standard for shipping lines.
- Common Interchange Criteria (CIC): A more conservative version of the UCIRC that is used with containers moving between shipping lines and leasing companies.
- Guide for Container Equipment Inspection, 6th edition from the Institute of Intermodal Container Lessors (IICL-6): A standard that is also predominantly used by leasing companies. This newest 6th version merged with the CIC, reducing the number of inspection options. The previous version, IICL-5, was a standard that stood on its own.
Related to all of these various inspection systems are the classification societies. These are independent, non-governmental organizations that conduct audits and inspections of all types of maritime equipment, including shipping containers.
These inspection societies use the inspection systems listed above (plus many others that have more niche applications) to certify a company’s containers for them. While there are nearly 50 classification societies spread around the globe, here are a few of the larger ones you may have heard of:
- The American Bureau of Shipping based in Houston, Texas, USA
- Lloyd’s Register based in London, England, United Kingdom
- Bureau Veritas based in Paris, France
- Nippon Kaiji Kyokai (ClassNK) based in Tokyo, Japan
- DNV GL based in Oslo, Norway
In addition to the societies are other inspection bodies and repair facilities, all of which are usually not even required to be the inspecting authority by any formal rule of law. Rather, regulations typically only require a competent person to do the required inspections.
It’s certainly a confusing mix of inspection types and the groups that can conduct them. And that’s only the beginning. There are additional requirements (and approvals) for things like railroad and road transit, not to mention the rules that come into play for carrying dangerous cargo or moving through customs between countries.
The US military also has its own standards for ISO containers, called MIL-STD-3037. This ‘Inspection Criteria for ISO Containers and Department of Defense Standard family of ISO Shelters’ is actually worth skimming through due to the pages of detailed information about container construction and repair.
We won’t bore you further by listing out the dozens of other regulating agencies and inspections. And if your head is already starting to hurt from all of this, don’t worry. You don’t need to understand the detailed inspection criteria of any of these standards nor understand who created or enforces them.
We present all the above information just for your general awareness. Upon purchase of a container, it’s possible that one of these inspections may be mentioned as being applicable, or a document regarding the inspection may even be given to you. This would probably only happen with new, one-trip, and cargo-worthy containers, but even then you shouldn’t concern yourself too much with these standards.
Unless you have plans to move your container home later, meeting or not meeting any of these standards and having the associated inspections is simply a “nice to have”. For the purposes of cargo storage or a container home, they don’t particularly matter.
Meeting a standard via inspection is a good sign of course, but NOT meeting it isn’t necessarily cause for alarm. It just depends on what your intended usage case is AND what caused the container to not meet the standard.
The takeaway here is that there are a lot of people thinking about the condition of containers, how to keep them in service, how to determine when it’s time to retire them, and what can be done with them after retirement. Now that you understand the background of professional inspections, let’s talk about how to do your own personal inspection when you’re thinking of buying a new container.
When to Inspect your Shipping Containers
As you launch your container home project, it is vital that you take the time to thoroughly inspect your shipping containers yourself. Neglecting to take this step can result in problems that will have to be addressed at one point or another. Often these issues can lead to costly repairs.
The inspections mentioned in the above section are complex and cumbersome, but necessarily so given the heavily-loaded, treacherous journey at sea that the containers will undergo. For a container home, you can usually afford to be a little less strict on some of the requirements. Almost everything can be inspected visually without a need for detailed measurements and go/no-go conditions for each specification.
Before we get too far into the details of conducting inspections, we need to mention the difference between pre-purchase inspections and post-purchase inspections. Depending on where you buy your container, you may or may not get a chance to physically inspect the container before it is delivered. The actual inspection activities are similar in both cases, but the timing and the implications are quite different.
Pre-Purchase Inspection Guidelines
When and where possible, an inspection conducted prior to the purchase of your containers is desirable. If you’re geographically close enough to the location of the containers, you can drive there and do the inspection in person.
Otherwise, a photo or video inspection may have to suffice. If you’re able, try to give specific instructions about what you want to be filmed or photographed (based on our guidance below). If you’re just given pre-existing pictures or video, it may not include coverage of everything you need (and you’ll be taking on a bit more risk, depending on the warranty/guarantee provisions of the company you buy from).
Post-Purchase Inspection Guidelines
A post-purchase inspection typically takes place after the containers are delivered to your building site. Remember that a successful inspection is dependent on someone being there to conduct it. You always want to be on-site when your containers arrive, or at the very least, have a trusted and competent person there to receive and inspect them for you.
Depending on your agreement with the seller, you may have paid for part or all of the containers’ purchase price prior to their arrival. You’ll probably have to sign off on a company acceptance form to officially take custody of the containers. Ideally, you’d have your inspection completed prior to this, but you’d have to be quick…time is money and the drivers may not want to wait.
The drivers probably won’t let you climb on or in the container while it’s still loaded, so you’ll initially have to do a cursory exterior inspection until it’s safely on the ground. If you immediately spot something wrong with the container, talk to the driver and immediately get on the phone with the seller before it even gets offloaded if possible.
Every seller agreement is different, but the sooner you can catch an issue, the better. If the seller has to dispatch another driver at a later date to pick up the container, they are probably going to give you some pushback and perhaps a supplemental bill.
How and What to Inspect on a Cargo Container
Everyone’s container home build is different and thus, their needs are different. Some designs are more compatible with lower-quality containers than others, for example.
While container carriers have higher threshold inspections for their usage in sea transport, you might be able to live with some things that they can’t. This is especially true if you’re planning to make cuts and alterations to the container anyway. With some thought, you can orient your design in such a way that any damaged areas are going to be cut out anyway for windows, doors, and wider rooms.
The inspection methodology we recommend is relatively simple and doesn’t require any specialized equipment or knowledge. Rather, it’s primarily a detailed visual and functional inspection of all parts of the container. By breaking the container up into its constituent parts, you can follow a procedure and ensure nothing is missed.
For the visual inspection, the fundamental rule we encourage you to use is to scan with your head and eyes in a direction perpendicular to the direction you’re walking. For instance, if you’re inspecting the floor, walk front to back and scan left and right. If you’re inspecting a wall, walk front to back while scanning up and down. This simple technique will ensure your eyes see every inch of the container.
There are a handful of tools that will be useful as you conduct your inspection. And don’t worry, you probably already have most of them.
First is an extra-long selfie stick with a remote shutter button which allows you to get pictures and videos that are difficult or dangerous to reach by hand.

Next is a flashlight which is necessary for the interior inspection. A ladder or stepstool can be useful to visually check the top beams and roof. And finally, a hammer or other heavy, metal object can be used to check rust severity.
Container Structural Frame
A shipping container’s strength comes primarily via the 12 steel beams that form the edges of each of its six faces. These beams have different sizes and cross-sections depending on if they are corner beams, bottom rails, top rails, etc.
You really want to see these beams in good condition. Most other parts of the container can be patched or repaired fairly easily, but damage here is not as easy to fix. Note that most of these beams have a hollow cross-section, meaning that you need to look at them from both inside and outside to get a true view of their condition.
Surface rust is nothing to be too worried about, but deeper rust and corrosion will have a noticeable effect on the beam’s strength.
Underneath the Container
The underside of a container is the part most people never see, but it’s still important. It’s made up of a number of small transverse beams that span across the width of the container and the two bottom rails. These cross members are what the plywood container floor is screwed into.
40-foot containers usually have a gooseneck tunnel at one end, which is an area at one end of the container that is meant to fit over certain types of trailers to lower the overall height during highway transport. This is normal and you can visually inspect the beams in this area just like another other.
Because these cross-members are some of the closest parts of the container to the ground (and they are usually out of the sun which would normally dry them), they will often be the place you’ll find the most rust. However, it’s also the hardest place to inspect because it’s underneath the container!
Depending on the offloading method used by the deliverer, mid-way through being moved from truck to ground could be a great time to have a look or snap a few pictures of the bottom of the container. Once on the ground, this area will be difficult to view unless you have heavy equipment to pick the container up.
Obviously, use EXTREME caution here, and don’t EVER put any part of your body below a suspended container. The selfie stick mentioned earlier can be a great tool for this inspection.
Damage underneath a container isn’t good, but it’s not the end of the world and is fairly easy to repair if required. No one will ever see your repair given the location, so it will just need to be functional.
Container Walls
The walls of the container make up the majority of what you see and think of when you picture a shipping container. The walls (both end walls and side walls) are made of corrugated steel, which help form the overall building envelope and provided supplemental structural strength as well. A container that’s had some use is likely to have surface rust and dents in the walls but that can be ok if not too severe.
The difference between surface rust and more prolific structural rust is usually pretty easy to spot. When in doubt, use a hammer to tap the area in question and look for large flakes that fall off, then listen for any change in sound compared to a non-damaged section.
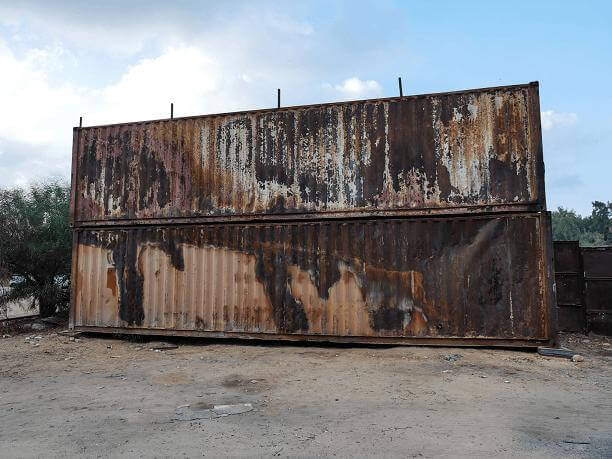
Obviously, if you can see through any part of the container walls, you’ve got a pretty big problem. While corrugated container walls can be patched, small holes likely indicate that future, larger holes will be coming too. A container that looks similar to the below picture may be too damaged to be worth repairing.
It’s possible that the planned door, window, and room cutouts for your container will coincide with damaged areas. This is a great situation where you can get the savings of a lower-quality container without making the sacrifices that usually come with them because the problem areas won’t be included in the house anyway. You will need some luck for everything to line up correctly for this to happen though.
A final note on dents, in particular, is their impact on your design. If you have dents (either protruding into the container interior or out away from the container), they may impact some of your other building components.
For instance, outward protruding dents can prevent an adjacent container from being placed correctly. And interior dents can impact your placement of interior walls. While dents can be flattened, the container wall material is surprisingly thick and strong, so this may sound easier than it actually is. Therefore, watch out for dents that are deep enough to potentially cause these types of construction impacts.
Container Roof
The roof is made from corrugated metal that’s shaped a bit differently from the walls. The best way to inspect it is to climb on top of the container. If that’s not a possibility, the selfie stick can be used to take photos or pictures.
You’re looking first for information about the general condition including prior patches, signs of standing water (usually coinciding with roof dents), etc. The hammer test can be employed here to differentiate between surface rust and deeper structural rust, but be careful that your body weight is as far as possible from the area in question.
You’ll have to wait until the interior inspection to see if the roof is actually waterproof, so for now, just focus on determining if the roof is in decent structural condition. If you plan to build a secondary roof over the container, then the condition of the roof doesn’t really matter much. As always, just keep in mind how you’ll be using the container, and don’t focus on areas that aren’t going to be relevant to your build.
Container End Doors
The end doors and their associated hardware are the only mechanical pieces of the entire shipping container (unless, of course, you use a refrigerated container). Anything that moves has a high chance of being impacted by dirt, rust, and other corrosion.
Try moving all four lock bars and see how easily they spin, how well the cams and keepers lock together, and how easily both doors open on their hinges. Also, have a look at the rubber gasket around the perimeter of the doors. Any missing chunks or especially dry/cracked areas probably signal the need for replacement.
Container Interior
For the most part, your interior inspection is just a continuation of what you did on the exterior. Your goal is to confirm the condition of the “other side” of all the materials you inspected from the outside.
So look at the walls, roof, doors, and structural frame members from this perspective. You’ll want to use your flashlight to ensure you get a good view.
To test the integrity of the cargo box’s envelope (AKA testing for water tightness), you’ll need to close the container doors as much as possible while you’re inside and look for any signs of visible light entering the container. In order for this work, it will have to be during daylight hours and will be easier on a non-overcast day.
If you have access to water, you could do a water test where you spray water on the roof and look for interior leaks, but this isn’t really necessary. If you don’t see any daylight from the interior, the chances of any leaks are slim. And if any tiny leaks do exist that you couldn’t see with the light method, you can quickly patch them with roofing cement or similar materials.
Container Floor
The flooring of your container deserves special mention. The most common type is plywood but there are other types available. In most cases, this will be the only permeable material used in the entire container. This means that it is the only place where spilled chemicals could have soaked a porous surface to any degree.
If possible, plan your interior inspection for a time after the doors have been closed for a while. This allows you to properly perform a smell test. As soon as you open the doors and walk into the container, give it a few sniffs. It is helpful to have another person with you for this process so that you have a second “tester”. Start off with shallow sniffs to avoid inhaling too much, but if you aren’t detecting anything, you can try for deeper sniffers.
You are smelling for mold and chemicals. If the container smells of mold, there likely is a leak somewhere, though you may have already caught it. It’s also possible that the leak was fixed but the moldy smell remains. If so, try to find the problem area on the floor that’s causing the smell.
Note that just because you can smell a chemical doesn’t necessarily mean it’s toxic or harmful. Almost any substance can be harmful if there is enough of it, so it’s the concentration that’s most important. The smell test really only makes you start to ask more questions and isn’t necessarily definitive proof of anything problematic as it isn’t a quantitative measure of concentration. Nevertheless, if you have several containers to pick from, the ones with less smell are probably a better choice.
As far as the physical condition of the floor, if you’re planning to reuse the existing floor as either a finished floor or a subfloor, ensure there aren’t any large holes or chunks missing nor any substantial gouges.
Documentation of Container Specifications
There are several types of data and documentation attached to or affiliated with an individual shipping container. Understanding what some of it means can help you piece together the container’s history.
CSC Plate
The previously mentioned CSC Plate or Combined Data Plate is the most information-rich part of the container. It’s a permanently attached metal plate with relevant statutory information.
We’ll use the example CSC Plate below to help explain some of the different pieces of data.
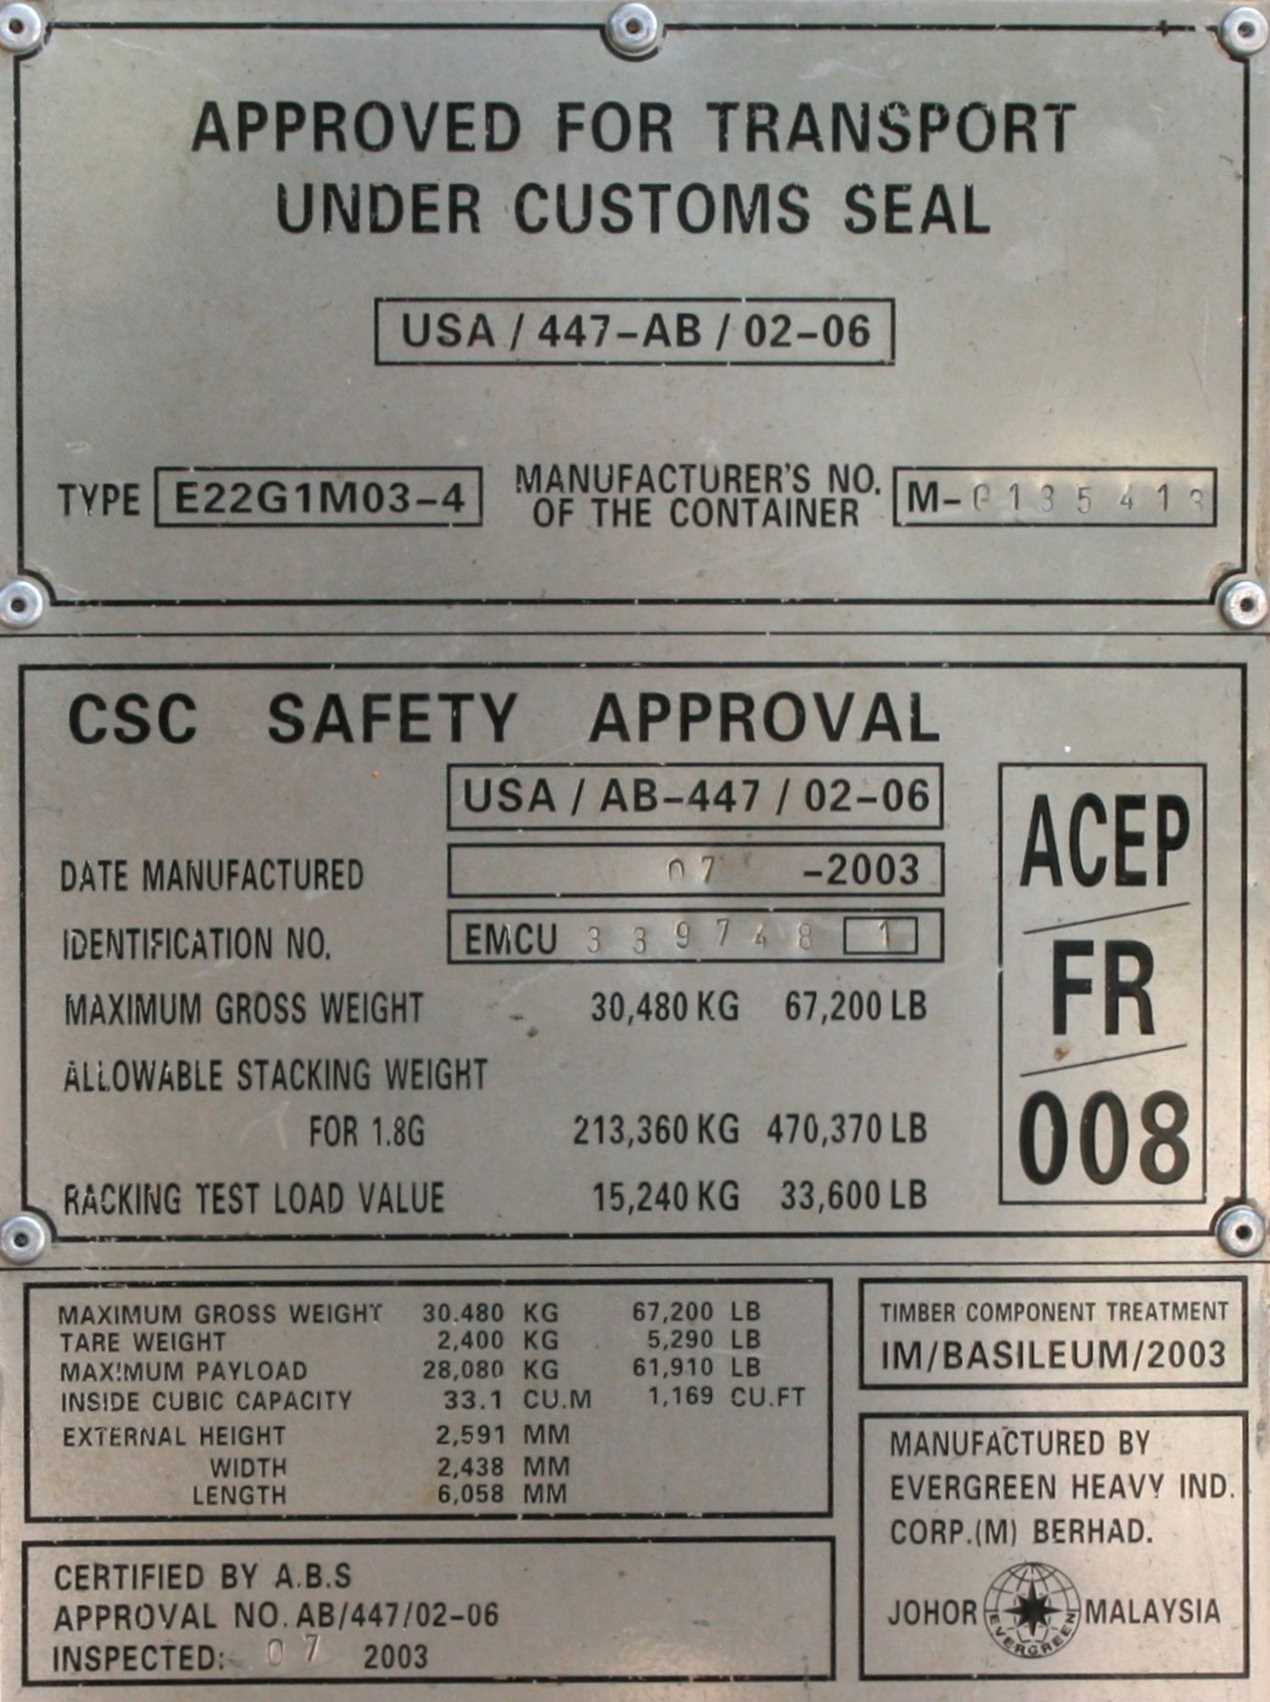
Container Identification Number or BIC Code: This number is inclusive of the owner prefix, equipment identifier, serial number, and check digit. It identifies the container and the owner. The check digit is used to ensure that the Container Identification Number is recorded correctly (If you use the check digit calculator and calculate a different check digit than what is shown, you must have written down the BIC Code wrong).
Type Code: The type code is actually only 4 digits (you can look up values for them here) but there may be some additional numbers or letters that are manufacturer specific. In this example, 22G1 means a normal height, general-purpose, 20-foot container.
Classification Society Approval: A required reference to one of the classification societies that handled the approval of the container. In this example, AB-447/02-06 means that the American Bureau of Shipping approved the container under approval number 447 in February 2006.
ACEP/PES: The plate will usually have room for either an ACEP number or dates of initial and follow-up PES examinations. In this example, ACEP Number FR/008 is given. It actually corresponds to ACEP Number FR.BV.008, issued by Bureau Veritas in France to Evergreen Containers.
Container Information Databases
Several operators and owners have lookup tools that allow you to find out more information about the containers they use, like these examples: OEG Offshore, Seaco, and Hapag Lloyd.
The BoxTech database containers self-reported technical information about millions of in-service containers and can be another interesting source of information
Now that you have a firm grip on what things to look for when inspecting a container, it’s time to go over how the things that you (and others in the process) inspect translate into informal categories of container conditions.
Shipping Container Condition Grading
People often talk about containers in terms of new and used, but there are actually quite a few intermediate conditions and grades, and there aren’t really any overall international standards other than a CSC certification. As you’ll see in a minute, categories that have fidelity beyond that, which includes intra-category grades, are usually just internal company conventions that don’t necessarily apply to other containers sold by other companies.
Also remember that ultimately, a real person that works for the seller had to assess the container and make a judgment call on the condition that isn’t necessarily the same decision someone else would make. It’s a subjective process that makes the process of buying a shipping container that much murkier.
You can get a good start on understanding the seller’s position by requesting clear guidelines on how the seller determines the condition and grade of a container. While we explain the more common options below, there can be small differences between companies, and it’s best to understand how your particular seller thinks about the different classifications they use.
In general, it is incumbent upon you as the buyer to not go off of the listed condition and grade alone, but to inspect the factors that lead to that condition yourself whenever possible. At the very least, you will want to have a way of getting out of the purchase if it’s later found out that you don’t agree with the condition assigned by the company.
It’s also important to note that these conditions and grades lean more toward cosmetic quality rather than structural quality. As you move into the lower quality conditions, assessing whether the wear and damage may have structural implications or is purely cosmetic becomes more important for container home builders.
With that background discussion out of the way, let’s start with a breakdown of the options first, then we can move on to some of the high-level advantages and disadvantages. We’ll first split the containers into two groups (New and Used), then subdivide them further.
Within all of these container condition classifications can be further grades, such as A, B, and C. Not all sellers will use grades, and the meanings of particular grades are open-ended, but they can be helpful filtering tools if you have a lot of containers to sort through. As we keep saying, the ultimate source of the condition is you and your inspection.
New (and New-ish) Containers
This group includes containers that are new, one-trip, and refurbished, all of which are generally what you could consider “as good as new”. Refurbished in particular is a bit tricky, as there aren’t standards for what ‘refurbished’ means with regards to containers that are no longer in service and not certified as CSC compliant.
In some cases, refurbished may be more fittingly categorized as used. This is something you can determine both with your own inspection and by hearing from the seller what steps they took in their refurbishment.
New Containers
A new container comes straight from the manufacturer and has never been used to transport cargo, though it still needs a CSC Combined Data Plate because the container will still have to be shipped to you despite being empty. You can’t really confuse new, it either is or it isn’t.
One-trip and Refurbished containers can be ‘like-new’, but only ‘new’ is new. Understand that new containers are still handled at the ports outgoing and incoming ports and may show small signs of exterior usage (although the interior should remain pristine).
One-Trip Containers
New and one-trip containers are sometimes used interchangeably, and yes, they are almost the same thing. However, one-trip containers are used to ship a single cargo load from their country of manufacture to your country, and once they have arrived at their destination they are available for sale.
In our opinion, it really doesn’t make sense to buy a truly ‘new’ container when a one-trip container is usually as ‘good as new’. It also seems a bit strange to be moving empty boxes around the globe when there is plenty of stuff we need to be shipped that can go inside for the journey. In exchange for your generosity, one-trip containers come at a nice discount to new containers.
Refurbished Containers
A refurbished container has undergone a process of restoration, but usually, that process is mostly cosmetic in nature. As the prices of containers have fallen over the past decade or two, the use of refurbishment by larger container owners has mostly gone away due to financial considerations.
It’s usually just cheaper to replace than refurbish cargo containers. Nowadays, almost any refurbishment is completed on the local level by the dealer or reseller themselves, where the economics can change a little bit and make cosmetic refurbishment profitable (most individuals purchasing containers from dealers don’t necessarily care about CSC certification, while the container owners absolutely do).
To understand what refurbished containers are not, look to repaired containers, which may still be in service if the repairs enable it to keep the CSC certification. Repaired containers meet performance specifications, but may have patches and replacement parts added over time, looking potentially unsightly yet still getting the job done.
For condition classification purposes, the differences are telling. Refurbished containers, in general, are striving to look close to new, though you’ll have to be the judge of if a particular refurbished container actually accomplishes that goal. And their performance could be up for debate.
Refurbishment can vary anywhere from just a new coat of paint to some component replacements. A common refurbishment procedure would be the attempted removal of significant dents and scratches, cleaning off dirt, spills, and stickers, taking off any surface rust, then priming and painting. There may also be some work done on the end doors and locking mechanism to ensure they close and lock correctly.
The point is that even for your local dealer, the current low price of containers makes it uneconomical to do extensive repair work as part of a refurbishment, so any refurbished container for sale was likely in decent condition to begin with. Otherwise, the container would have just been sold As-Is or scrapped.
Used Containers
Used is an open-ended term, spanning everything from barely used to completely used up, and everything in between. Containers have a natural life cycle, and even if they never experience any significant damage, they can still undergo general wear and tear.
This normal use and abuse makes their continued service after several years risky for operators and financially counterintuitive if they have already been fully depreciated for tax purposes. Further investment at this point (usually around 10-15 years of age) is foolish, and replacement is the obvious choice even though they still may have some life left in them.
Some of the containers falling into the used category are also those that were previously noted as being repaired. The repair may have been able to keep the container in service for a while (thereby categorized as Cargo Worthy), but it eventually needs to be retired (and so classified as Wind and Water Tight or As-Is depending on condition).
Cargo Worthy (CW) Containers
Cargo Worthy containers are by definition CSC-certified, which we remind you is a performance standard related to the capabilities of the container laid out in its original specification. They may have cosmetic issues, but they’ll perform to the same standards as a new container as far as hauling cargo.
If you think you’ll ever need to ship your container again in the future, purchasing a cargo-worthy container might be worth considering. However, any exterior modifications like door and window cuts are likely going to invalidate the certification, so keep that in mind. Even if you have no further shipment plans, cargo-worthy containers are generally just in better shape than some of the other used choices below.
Wind and Water Tight (WWT) Containers
WWT containers are another source of blurred lines. Theoretically speaking, a CW and WWT container may have almost no discernable differences to the average person (although in practice, most of the WWT containers may look a bit worse).
Perhaps a dent is just slightly deeper than inspection criteria allows for, or a structural member is bent a little more than can be accepted. Or maybe the container is just too old, despite performing fine, and further investment in repair and a certification inspection just isn’t practical.
As we hinted at earlier, after a container is retired, WWT is the highest condition it could be classified as unless it gets refurbished. And if a container on the verge of retirement experiences significant damage, it will likely skip right past WWT and be classified As-Is.
Either way, you can find some good values in the selection of WWT containers. They are the most economical choice that is widely available and still functional without additional repair work. But be clear in your understanding that functional does not always mean aesthetically pleasing, as these containers more often than not will have surface rust, peeling paint, and dents.
In most cases, it’s prudent to do a bit of preventative maintenance to extend the life of WWT containers, like surface rust removal and repainting problem areas. It’s important to note that like most of the conditions we’ve described, WWT is a wide category and can include containers of quite different aesthetic appearances.
Also, understand that WWT only describes how a container can withstand the elements and not the soundness of its structure. So pay close attention to the structural elements around and underneath the container if you’re planning to use your container as a home.
Many sellers will provide a guarantee that the WWT-rated container will maintain its weather tightness for a period of time, giving you extra piece of mind. Containers can stay at WWT condition for a long time if they are used in a way that doesn’t subjective them to very much wear and tear. But if they do experience significant damage, any repair work probably doesn’t make sense, and they’ll be pushed down to As-Is condition.
As-Is Containers
Containers labeled “As Is” can’t be guaranteed to perform to Cargo Worthy standards, and they usually have some type of visible damage keeping them from even being WWT. If companies could rate them in a higher condition and get more money, they would.
It’s theoretically possible that an As-Is container could be WWT except that it is just so old or has so many cosmetic defects that the seller doesn’t want to spend the time and money inspecting it closer. However, the more likely situation is that the container is in bad shape and probably not capable of being WWT. You should probably assume the worst.
For this category, in particular, you really need to see detailed pictures or visit the container in person before purchasing. As-Is leaves the door open for so many different kinds of wear and damage that you shouldn’t risk purchasing one of these sight unseen.
Not all container sellers deal with As-Is containers and the ones that do are unlikely to give you any kind of warranty. It’s truly buyer-beware here, but in the right situation, they could be a good bargain.
Pros and Cons of Container Condition Classifications
Reasons to Choose New (and New-ish) Containers
- Uniformity: These containers will be easier to work with as you convert them to a house. Nothing will be bent or out of place that might interfere with your placement of walls, adjacent containers, etc. The floor will be in good condition and the roof will shed water. Everything will just…work. You won’t need to do any rust removal or repainting either. The benefits here are magnified if you order more than one container: they should all be the same. Purchasing multiple used containers could get you a variety of different types of damage, wear, and tear, each of which needs its own type of remediation.
- Appearance: If you have to leave them sitting on your property for a while before you start your build, they’ll probably just look a little better. If you have nosy neighbors, they may be slightly less bothered by containers that are in like-new condition.
- Lifespan: In addition to a more meaningful guarantee, these containers have a longer lifespan before needing reconditioning when compared to used containers.
- Peace of Mind: Understanding the history of these containers is a benefit worth acknowledging. These containers either have a known history (new and one-trip containers) or a history wiped clean (refurbished containers, depending on the extent of the refurbishment). For instance, you shouldn’t have to wonder if a container was used to transport hazardous chemicals that may have leaked onto and soaked into the floor. Container companies do have to mark containers with decals if they are actively transporting hazardous chemicals, but as far as what was in it months or years ago, there are no guarantees or historical records. Buying a used container does have this risk, although it’s small and can be overcome.
Reasons to Choose Used Containers
- Affordability: Used containers are obviously the cheaper option, though the quality you need determines how much you’ll save. It’s rare to see a container worth buying for under $1000, but you can also see high-quality used containers for three times that amount. Either way, they are still less than New or New-ish which may be a better fit for your container project budget
- Availability: For a given geographic location, there are almost always going to be more used containers available than New and New-ish. However, your requirements may quickly remove a lot of those from the competition if their quality is too far from what you want. A secondary benefit of used container availability is that if you can find the used containers you want, you can probably get started on your build sooner. It may take a little more time for new containers to be built, one-trip containers to be located, and refurbished containers to be refurbished before you can have them delivered.
- Eco-Friendliness: One of the biggest advantages of used containers is that they are a more eco-friendly choice. Adaptive reuse is beneficial for society and the environment, as you’re not taking additional raw materials from the earth, and you’re removing and recycling what would otherwise end up being an eyesore stacked up in some storage facility. You may even qualify for some type of tax incentive or green building certification in exchange for your goodwill.
How Much Do Shipping Containers Cost?
The price of a shipping container can vary a great deal depending on the location, age, type, and condition (as we’ve just learned). However, we have put some estimates below to give you a rough idea of the costs. As we’ve already discussed, ‘used’ and ‘newish’ constitutes a great many different conditions, so you may find prices both above and below what we’ve listed.
- Used Standard 20 Foot Container: US$2,100
- Newish Standard 20 Foot Container: US$3,000
- Used Standard 40 Foot Container: US$2,850
- Newish Standard 40 Foot Container: US$5,600
- Used High Cube 20 Foot Container: US$2,200
- Newish High Cube 20 Foot Container: US$3,200
- Used High Cube 40 Foot Container: US$2,950
- Newish High Cube 40 Foot Container: US$5,800
What Condition of Shipping Container Should you Buy?
With your newfound understanding of the different container conditions available for sale, along with some of their overall pros and cons, as well as estimated prices, you should be starting to narrow the range of what will work for you and your project. To further that thought process, we recommend that ask yourself some questions about your needs and wants. Below are a few examples:
- Will you ever have to move your container again after it is placed? If yes, you should look for CW containers.
- Will your design include stacking, cantilever, or large spans in conjunction with large windows and doors? If yes, be extra careful in your inspection about any structural damage to the main support beams.
- Will you be removing a substantial portion of the container walls to create a larger open space? If yes, again be extra careful in your inspection about any structural damage to the main support beams. But you may have an opportunity for cost savings by finding containers with damaged walls that will be removed anyway.
- Will you have a separate roof above the container? If yes, don’t worry about damage to the container roof.
- Are aesthetics important to you? If yes, a new or new-ish container is probably best unless you have the time and equipment to refurbish a lesser container yourself.
- Are you planning to replace the container floor or treat it as a subfloor beneath a finished floor? If yes, don’t worry about damage to the plywood floors in the container.
These questions, and other’s like them that you’ll have to think through for your own project, should help you determine what condition of containers you should focus your energy on locating and purchasing.
One last, quick recommendation: When possible, we recommend you try to purchase all your containers from the same shipping line. There can occasionally be slight differences in measurements and configuration between manufacturers, though they all must still meet the ISO specifications, so the differences aren’t major.
When your build has multiple containers, the construction process is made ever so slightly easier when every container is exactly the same. And if your containers have the same colors and/or logos, it can make your project look more uniform. On the other hand, if you’re hoping to get a varied look across multiple containers, choosing from multiple brands will give you several different colors and marking schemes.
Summary
As a buyer, you’re now in a strong position. You understand the meaning behind the various conditions of containers, you know about the benefits and downsides of the various choices, and you even know how to inspect a container to ensure that what’s written matches reality. With that, you’re ready for the next step, finding and buying your shipping containers!
Let us know your thoughts on everything we’ve discussed in the comments below!
12 Responses
I thank you for the valuable information. I have had an interest in these containers for years. Your site gave me much information and cost which at 73 with a disabled son (functional) 45 like the concept help determine if this is the right project for us to get involved with and live in.
Happy to help!
Has the price of containers changes significantly during COVID? The price I find on 1 trip container is now 40% ~ 60% higher. What is the good source to track price trend of 1 trip containers?
The site has so much good information, thank you!
Thanks for reading! Yes, the price of containers has temporarily gone up in many places due to several factors including COVID and its 2nd order effects, the previous Suez canal blockage, port damage in Taiwan, etc. This article (https://www.discovercontainers.com/how-to-purchase-your-shipping-containers/) has information on where to purchase containers, including our friends at Box Hub, where you can see live pricing of containers in a variety of locations.
Can you use an open top container upside down? Have a sunk in floor and put the container upside down on top of the footing?
You could if you already have a structural floor. You’ll just have to build a roof on top of the container’s “floor”, as it just had steel cross members holding up the plywood.
I found this page searching for an answer to this question: is an open-top container a viable option for use in home construction? Seems to me the open top would allow for higher ceilings when a roof is added. My question is this, will an open-top have the same structural integrity? can an open-top hold the weight of a gable roof?
Any help would be awesome thanks.
Yes an open-top container is certainly viable, and maybe even preferable if you’re planning to have higher ceilings or a gable roof. The reason they aren’t talked about is much is because they are much less common. But if you can find one nearby for a reasonable price, it could be a great starting point for a container building project. Here’s an example from one company, and you can see it can still hold 58k lbs inside. http://www.seabox.com/cutsheets/SB6432.pdf
i am planning to buy a container and i want to use it as a moden kichen restaurants dinning outside what structures can you recomend how much i can budget i want to come with something different but classy
Using containers as a kitchen or coffee shop is something that has been done before successfully. You need to ask yourself a few questions like: Why the interest in containers? Are you hoping to be able to move the container eventually and like the option for portability, or do you just appreciate the architectural style possible with shipping containers? Are you hoping to have both kitchen AND dining facilities in containers, or only a kitchen? If you’d like to discuss this more in depth, feel free to email us via the ‘Contact Us’ page at the top of the website.
I am a Builder, I had never looked in to container homes, I would like to learn more
Keep reading the other great articles on our site, and consider purchasing our DIY eBook as well, which has even more information on the process of converting an empty container into a livable space.